How-To DIY Baby Carrier Repairs: Easy Step-by-Step Sewing Fixes for Safe, Secure Carriers
Parents who rely on a baby carrier understand that durability and comfort are essential for both child and caregiver. Over time, cushions wear down, straps fray, and buckles loosen, creating safety concerns that demand prompt attention. This guide provides a systematic approach to repairing a common carrier model, enabling one to restore functionality without professional assistance. By following each instruction, the reader will gain confidence in maintaining a secure carrier for many months to come.
What You Will Need
- A Sunlite Child Carrier Cushion Set (Price: $32.20, Rating: 4.6/5.0)
- A Voltrish Buckle & Strap Kit (Price: $5.79, Rating: 4.6/5.0)
- A J.CARP Quick Release Buckles (Price: $6.99, Rating: 4.6/5.0)
- Heavy‑duty sewing needle and polyester thread
- Sharp fabric scissors
- Measuring tape or ruler
- Seam ripper (optional)
- Pin cushion or safety pins
Step 1: Assess the Damage
The first action is to examine the carrier thoroughly, noting any sagging cushions, frayed webbing, or loose buckles. One should place the carrier on a flat surface and gently press each cushion to gauge compression loss. Record the locations where stitching has separated, because these points will guide the repair sequence. A clear assessment prevents unnecessary disassembly and saves time.
Step 2: Remove the Worn Cushion
With the carrier laid out, locate the stitching that secures the original cushion to the carrier shell. Using a seam ripper, carefully cut the threads, taking care not to damage the surrounding fabric. Once the cushion is free, set it aside for disposal or future recycling. The new Sunlite Child Carrier Cushion Set provides a factory‑grade replacement that matches the original dimensions, ensuring a proper fit and consistent support for the child.
Step 3: Install the Replacement Cushion
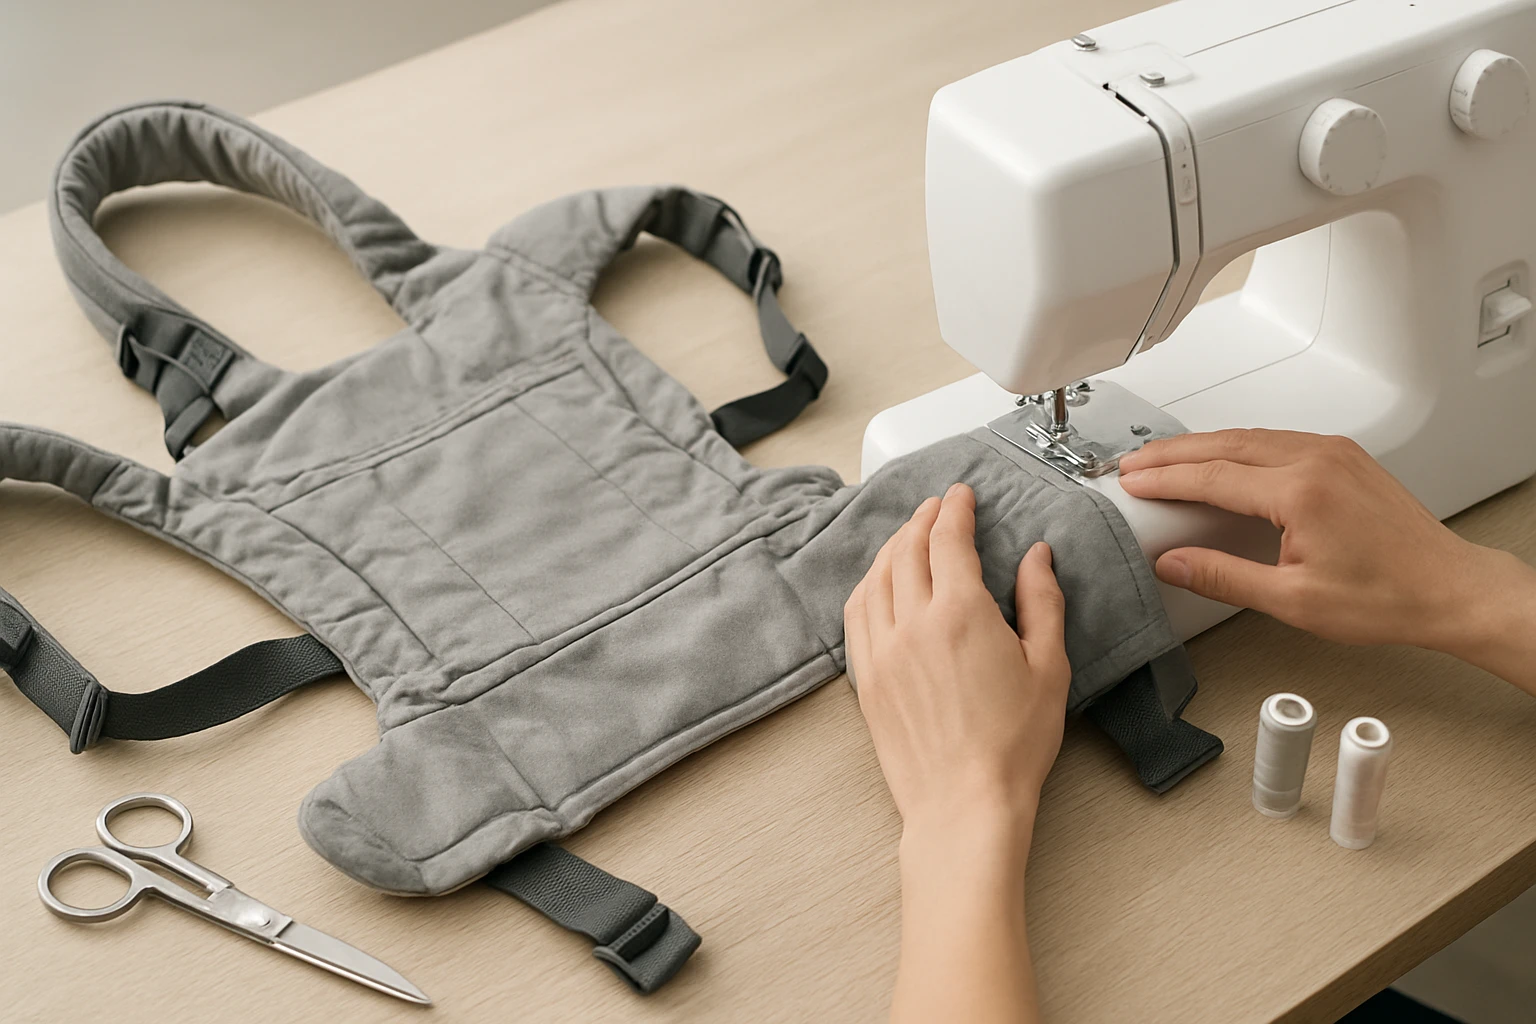
Position the replacement cushion within the carrier shell, aligning the pre‑cut slots with the carrier’s seam lines. Pin the cushion in place using safety pins to prevent movement during stitching. Thread a heavy‑duty polyester needle with matching thread and sew along the original stitch line, employing a double‑stitch for added strength. After sewing, remove the pins and smooth the cushion to verify that it sits flush without gaps.
Step 4: Reinforce or Replace Straps and Buckles
If the carrier’s webbing shows signs of wear, replace the affected sections with the Voltrish Buckle & Strap Kit. This kit includes six yards of 1‑inch wide polyester webbing, six quick‑release buckles, and twelve triglide clips, providing ample material for most carrier models. Cut the new webbing to the required length, attach a quick‑release buckle from the J.CARP Quick Release Buckles using the provided side‑release design, and secure the ends with strong stitching. The side‑release buckles allow one‑handed adjustment, which is advantageous when the carrier is being worn.
When attaching the new buckles, ensure that the webbing is folded back at least ¼ inch before stitching to create a reinforced loop. Sew using a backstitch for maximum durability, and test the release mechanism repeatedly to confirm smooth operation. The combination of the Voltrish webbing and J.CARP buckles yields a repair that is stronger than the original components, reducing the risk of future failure.
Step 5: Final Inspection and Safety Test
After completing all sewing work, conduct a comprehensive safety inspection. Check every seam for uniform tension, verify that all buckles release and lock correctly, and ensure that the cushion remains securely attached. Perform a load test by gently applying weight equivalent to a child’s torso, observing any deformation or shifting. Once the carrier passes these checks, it is ready for everyday use.
Tips & Pro Tips
- Use polyester thread rather than cotton because it resists stretching under load.
- Apply a fabric glue sparingly on high‑stress points for extra reinforcement, but do not rely on glue alone.
- When measuring replacement webbing, add an extra inch to allow for seam allowances.
- Store the carrier in a dry environment to prevent mildew that can weaken fabric fibers.
Troubleshooting
If the new cushion feels loose after installation, re‑examine the stitching for gaps and resew any missed sections. A common cause is uneven pin placement that leads to misalignment during sewing. Should a quick‑release buckle jam, clean the latch area with a soft brush to remove debris and lubricate lightly with silicone spray. Persistent jamming may indicate that the buckle is incompatible with the webbing width; in such cases, select a buckle that matches the 1‑inch webbing specification.
Conclusion
This guide has demonstrated how to diagnose, disassemble, and repair a baby carrier using readily available tools and high‑quality replacement parts. By following the step‑by‑step instructions, one can restore the carrier’s comfort and safety without incurring expensive professional fees. The reader is encouraged to apply these techniques to other carriers, adapting the process as needed for different designs.
Regular maintenance, combined with timely repairs, extends the life of a baby carrier and protects the child from potential hazards. One should schedule a brief inspection each month to catch wear early and repeat the repair process whenever necessary.
Products Mentioned in This Guide
Frequently Asked Questions
What tools and materials are required for DIY baby carrier repairs?
You’ll need a heavy‑duty sewing needle, polyester thread, a replacement cushion set, a buckle & strap kit, quick‑release buckles, and sharp fabric scissors.
How do I repair frayed or broken straps on a baby carrier?
Remove the damaged section, attach the new strap from a buckle kit, and sew it securely using a strong polyester thread.
Is it safe to sew my own baby carrier cushion replacement?
Yes, as long as you use a heavy‑duty needle, high‑quality polyester thread, and follow the guide’s stitching pattern for even support.
How often should I inspect my baby carrier for wear and damage?
Check the carrier before each use and perform a thorough inspection at least once a month for signs of wear, fraying, or loose buckles.
Can a broken buckle be replaced with a quick‑release buckle?
Absolutely—swap the old buckle for a compatible quick‑release model and stitch it firmly to ensure a secure, easy‑release connection.